How to Season a Blackstone Griddle Like a Pro – Academy Guide
A Blackstone griddle is a versatile and powerful cooking tool, perfect for everything from breakfast classics to grilled meats and veggies. However, to get the best performance from your griddle and ensure a non-stick surface, it’s essential to properly season it before use. Seasoning your Blackstone griddle creates a protective layer that not only prevents food from sticking but also helps prevent rusting and extends the life of your griddle.
In this guide, we’ll walk you through the step-by-step process of how to season your Blackstone griddle like a pro, ensuring you’re ready to cook up restaurant-quality meals in no time.
Why Seasoning a Blackstone Griddle is Important
Seasoning a griddle involves applying a thin layer of oil to the cooking surface and heating it to a high temperature. This process creates a polymerized layer—a hard, non-stick coating that bonds to the metal surface, making your griddle easier to cook on and clean.
There are several key benefits to seasoning your griddle:
- Non-stick surface: Proper seasoning prevents food from sticking, allowing you to cook delicate items like eggs and pancakes effortlessly.
- Rust prevention: Seasoning creates a protective barrier against moisture, which can cause rust.
- Enhanced flavor: Just like a cast-iron skillet, a well-seasoned griddle will improve the flavor of food over time as layers of seasoning build up.
- Prolonged lifespan: Regular seasoning helps protect your griddle from damage and wear, ensuring it remains in top condition for years to come.
What You’ll Need to Season Your Blackstone Griddle
Before starting the seasoning process, gather the following materials:
- High smoke-point oil: Choose an oil with a high smoke point, such as flaxseed oil, canola oil, vegetable oil, or grapeseed oil. Flaxseed oil is often recommended because it creates a very durable polymerized layer.
- Paper towels or a lint-free cloth: For spreading the oil evenly across the griddle surface.
- Heat-resistant gloves or tongs: To protect your hands from the heat.
- Grill scraper or spatula: For cleaning and removing any debris from the griddle before seasoning.
Step-by-Step Process to Season a Blackstone Griddle
Follow these steps to season your Blackstone griddle properly:
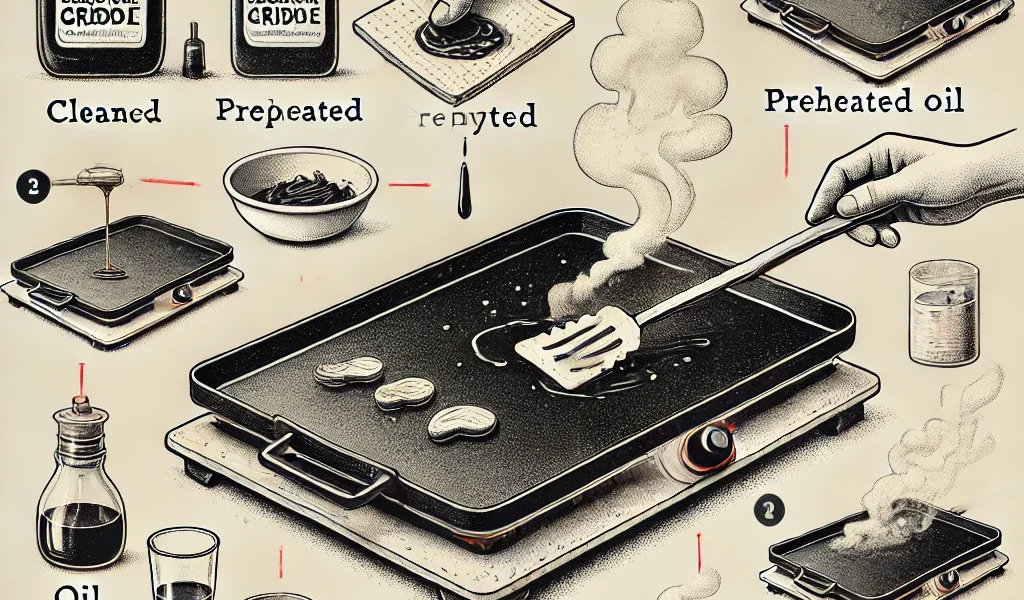
1. Clean the Griddle Surface
Before seasoning, make sure your griddle is completely clean. If it’s brand new, remove any protective coatings or residue from manufacturing by washing the surface with warm, soapy water. For used griddles, use a grill scraper to remove any leftover food particles and wipe the surface with a damp cloth. Allow it to air dry completely.
Pro tip: Never use soap again after the first cleaning, as it can strip away the seasoning layers.
2. Preheat the Griddle
Turn on your Blackstone griddle and set it to high heat. Let it preheat for 10-15 minutes. You’ll know it’s ready when the surface starts to darken and change color slightly. This indicates that the griddle is hot enough to begin the seasoning process.
3. Apply the First Layer of Oil
Once the griddle is hot, pour about 1-2 tablespoons of your chosen oil onto the surface. Using a paper towel or a lint-free cloth, spread the oil evenly across the entire griddle, including the edges and corners. Be sure to use heat-resistant gloves or tongs to avoid burning yourself.
The goal is to apply a thin, even layer of oil—too much oil can create uneven seasoning or a sticky surface.
4. Let the Oil Smoke
After applying the oil, let the griddle heat up until the oil begins to smoke. This is known as the “smoke point.” As the oil reaches this temperature, it starts to bond with the metal and create the polymerized layer.
The griddle will begin to darken as the oil continues to smoke, which is a sign that the seasoning process is working. Allow it to smoke for 10-15 minutes, or until the smoke starts to diminish.
5. Repeat the Seasoning Process
Once the first layer of oil has smoked off, it’s time to repeat the process. Apply another thin layer of oil to the griddle, spread it evenly, and let it smoke again for another 10-15 minutes.
Repeat this process 3 to 4 times for best results. Each layer adds to the non-stick coating and improves the durability of the seasoning. The surface of your griddle should gradually turn from shiny to matte black as the seasoning builds up.
6. Cool Down and Store
Once you’ve applied several layers of seasoning, turn off the heat and let the griddle cool down completely. At this point, your Blackstone griddle should have a smooth, blackened surface that’s ready for cooking.
After each use, wipe down the griddle with a small amount of oil to maintain the seasoning and prevent rust.
Maintaining Your Seasoned Blackstone Griddle
Seasoning is not a one-time process—it requires maintenance to keep your griddle in top condition. Follow these tips to maintain your griddle like a pro:
- Reapply oil regularly: After each cooking session, apply a thin layer of oil to the griddle to maintain the seasoning.
- Clean without soap: Use a grill scraper or spatula to remove food debris, then wipe the griddle with a damp cloth. Avoid using soap or harsh chemicals, as they can strip away the seasoning.
- Avoid acidic foods: Foods like tomatoes or vinegar can break down the seasoning, so be cautious when cooking acidic ingredients.
- Reseason when necessary: If you notice that food starts sticking or the surface looks dull or patchy, it’s time to reseason your griddle.
Troubleshooting Common Seasoning Issues
Here are some common issues you might encounter when seasoning your griddle and how to fix them:
- Sticky surface: This usually happens when too much oil is applied at once. To fix it, heat the griddle again and scrape off the excess oil. Reapply a thinner layer of oil.
- Uneven seasoning: If parts of your griddle are more seasoned than others, repeat the seasoning process, making sure to spread the oil evenly across the entire surface.
- Rust spots: Rust can develop if the griddle isn’t dried properly or left exposed to moisture. Scrape off the rust, clean the area, and reseason the griddle.
Conclusion
Seasoning your Blackstone griddle is essential for creating a durable, non-stick surface that enhances the cooking experience and prolongs the life of your griddle. By following the steps outlined above and maintaining the seasoning with regular care, you’ll be able to cook like a pro, enjoying perfectly cooked meals every time.
Whether you’re searing steaks, grilling veggies, or making a big breakfast, a well-seasoned Blackstone griddle will be your go-to tool for outdoor cooking. Happy grilling!